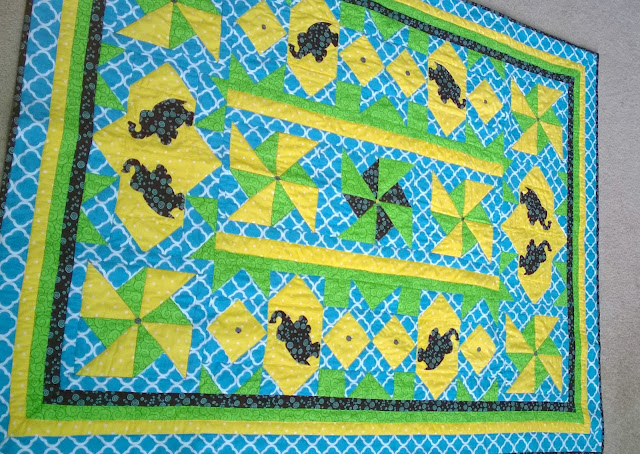
When I completed my borgello hearts quilt, it had taken so long that I forgot about the actual first ever quilt I made for Baby Aprorva, our friends Tulsi and Abhijaat's new born boy :) I wanted to gift them something hand made and this is what it turned out. This was something I just came up with in paint shop and was then quite easy to go ahead and stitch. Only troublesome part in it was making that elephant shape. I went ahead and drew it on one page and then cut the rest using sharp scissor. Used the applique technique to stitch it to the quilt and hand hemmed it to make sure the edges don't come out. Also hand hemmed the double folded fabric strip as a binding. Overall then I wasn't that satisfied with this quilt but now when I look back in perspective I am quite happy about how it turned out given this was my first ever quilt and I had to learn basic stuff through books and youtube videos.
Started by designing this in paint. (And you will soon realize from my posts I am nerd and addicted to technology :D) It helped me play with color combinations, shapes till I had something I really liked.
Then I bought following material:
Blue fabric - 2.25 Yard
Green fabric - 1 yard
Yellow fabric - 1 Yard
Chocolaty fabric- 3/4 Yard
Batting of size 45 x 60 inch
Pin wheels
Make 4 Pin Wheels for corners:
Index
|
Color
|
Shape to cut
|
Count
|
Total cut pieces
|
1
|
Yellow
|
5-1/8 inch square
|
2
|
4 triangles
|
2
|
Green
|
5.25 inch square
|
1
|
4 triangles
|
3
|
Blue
|
5.25 inch square
|
1
|
4 triangles
|
4
|
Blue
|
8.5 inch x 1.5
inch
|
2
|
2
|
5
|
Blue
|
10.5 x 1.5 inch
|
2
|
2
|
6
|
Chocolaty
|
Circle according
to pattern for center of pinwheel
|
1
|
1
|
Center pieces for top and bottom portion - Make 2 mirror pieces
Index
|
Color
|
Shape to cut
|
Count
|
Total cut pieces
|
1
|
Yellow
|
10.5 x 5.5
|
1
|
1
|
2
|
Yellow
|
6.25 inch square
|
1
|
4 triangles
|
3
|
Blue
|
6.25 inch square
|
1
|
4 triangles
|
4
|
Blue
|
3.25 + 1/8 inch square
|
4
|
8 triangles
|
5
|
Green
|
3.25 + 1/8 inch square
|
4
|
8 triangles
|
6
|
Chocolaty
|
Mirror patterns
|
1
|
2
|
Center Pinwheels piece -Make 1
Index
|
Color
|
Shape to cut
|
Count
|
Total cut pieces
|
1
|
Yellow
|
5-1/8 inch square
|
4
|
8 triangles
|
2
|
Green
|
5-1/8 inch square
|
2
|
4 triangles
|
3
|
Green
|
5.25 inch square
|
2
|
8 triangles
|
4
|
Chocolaty
|
5.25 inch square
|
1
|
4 triangles
|
5
|
Blue
|
5.25 inch square
|
3
|
12 triangles
|
6
|
Blue
|
8.5 inch x 1.5
inch
|
2
|
2
|
7
|
Blue
|
8.5 inch x 2.5
inch
|
2
|
2
|
8
|
Blue
|
30.5 x 1.5 inch
|
2
|
2
|
9
|
Chocolaty
|
Circle according
to pattern for center of pinwheel
|
2
|
2
|
10
|
Yellow
|
Circle according
to pattern for center of pinwheel
|
1
|
1
|
Both sides
pieces - Make 2 mirror pieces for two sides

Index
|
Color
|
Shape to cut
|
Count
|
Total cut pieces
|
1
|
Yellow
|
5.5 inch x 5.5
inch
|
2
|
2
|
2
|
Yellow
|
4 inch x 4 inch
|
4
|
4
|
3
|
Yellow
|
6.25 inch square
|
1
|
4 triangles
|
4
|
Blue
|
6.25 inch square
|
1.5
|
6 triangles
|
5
|
Blue
|
3.25 + 1/8 inch square
|
12
|
24 triangles
|
6
|
Green
|
6.25 inch square
|
0.5
|
2 triangles
|
7
|
Green
|
3.25 + 1/8 inch square
|
4
|
8 triangles
|
8
|
Green
|
3inch x 3inch
|
4
|
4
|
9
|
Green
|
30.5 inch x 1.5
inch
|
1
|
1
|
10
|
Yellow
|
30.5 inch x 2 inch
|
1
|
1
|
11
|
Chocolaty
|
Mirror patterns
|
1
|
2
|
For Borders cut along its width (all the fabrics were
44 inch wide) :

Index
|
Color
|
Strip Width
|
Count
|
1
|
Chocolaty
|
1.5 inch
|
5
|
2
|
Yellow
|
1.5 inch
|
6
|
3
|
Green
|
1.5 inch
|
6
|
4
|
Blue
|
2.5 inch
|
6
|
5
|
Chocolaty
|
2.5 inch
|
5.5
|
Used remaining blue fabric for backing.
Chocolaty fabric (5) from above cut was folded in half and stitched as double cloth binding.
Quilting was done using stitch in ditch method, only I didn't know it was called that until I read about it :)
Chocolaty fabric (5) from above cut was folded in half and stitched as double cloth binding.
Quilting was done using stitch in ditch method, only I didn't know it was called that until I read about it :)


Comments
Post a Comment